Search

Life in the countryside

about growing and harvest

Category

Uncategorized

Rhubarb madness

It’s been a while, hasn’t it? My life has been in a bit of a roller coaster type pace for a bit. I’ve been travelling the globe to visit friends and to give aid to  to the poorer people on the European continent.

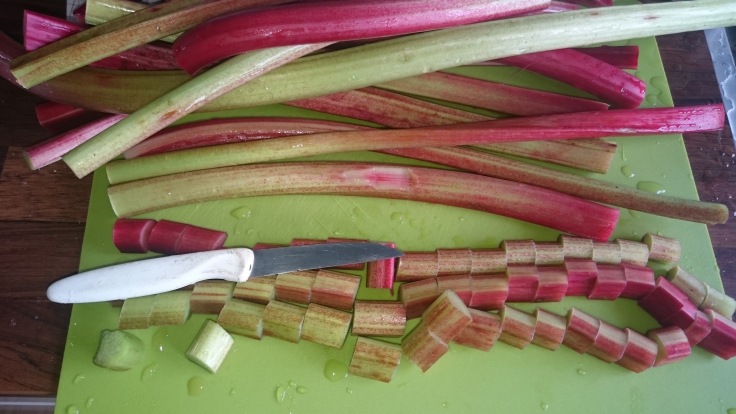
Upon arriving home the weeds had had their chance to establish in the garden. The timing on my travels also meant that I have less control over the sowing and the growing of seedlings this year. How lucky I am to have some “stayers” in the garden. Trustworthy strawberries, raspberries and of course  the rhubarb. The tart rhubarb has been a favourite for some time, I for one can’t remember not liking it. So this year: more than 5 kilo’s of Rhubarb harvested. Some just to chop up and end up in a rhubarb compote. Loads of that will be eating straight away. Did you try using different sweeteners? We do. Using honey, regular sugar, light brown sugar and artificial sweeteners. Adding strawberries is not something we seem very partial to. Me? I personally think it’s a waste of both. But than again, I might not have found the right balance yet.

DSC_0414

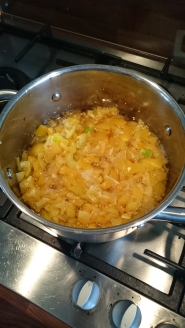
This years crazy idea came from my moms’ earlier attempts at Rhubarb Jam. Not really a crowd pleaser: not enough sweetness for anyone but mom. SO this years experiment is called: Rhubarb Marmalade! My sister and her boyfriends family are totally in love with zucchini marmalade. So here we go with another marmalade.The original recipe came from Taste of Home. The original recipe called for as much sugar as rhubarb. As we try to reduce the sugar I used this recipe as a guideline.The other change I made was to add more orange to the jam.  Omitting the amount of sugar that was called for might have been the reason that I needed to add some pectine to the marmalade. Another reason might have been that I used some prepared orange peels as mentioned in an earlier post. By doing so I had no added natural pectine from the citrus peels. But whatever you do: Make it in a way your taste buds like!

Ingredients
*10 cups Rhubarb
*5              Peels of Oranges
*2 cups    Orange juice
*                 Pectine
*                Sugar/ honey to the taste

_20160711_191104


Combine the Rhubarb, orange peels, juice and sugar in a large pot. Bring to the boil and then reduce heat to a simmer.

Simmer for about an hour. Stir occasionally.

After an hour check the gel stage of your marmalade. If not satisfied; adjust it!

Scoop into jars (use your favourite canning technique), label and enjoy!


Apple pie

In the winter it is a bit quiet. Not that many homegrown things, besides the usual suspects as kale and other types of cabbage. But it is a season with many feasts. As for all occasions there are some favourite pies. In our family apple pie is one of the go-to pies for any occasion.

DSC_0539

Throughout the years we’ve made this pie with many different types of apples and in many ovens. A few other recipes have past the review too. Here I’ll share our standard recipe. Any apple could get you a nice result, as long as you keep their characteristics in mind. The most of a succes I’ve had however was using the Goudrenet apples. That might just be because I am so familiar with it’s flavour and behaviour when used in cooking and baking. Enjoy!


Ingredients

300 grams       Self rising flour
1      knife tip   Salt
1      teaspoon  Lemon zest
150  grams       White sugar, fine
2      bags          Vanilla sugar
200 grams       Butter, cooled and diced
1                          Egg, whisked

1       kilo             Apples
150  grams         Raisins
1       teaspoon  Cinnamon powder
.                            Lemon juice
.                            Sugar
.                           (Custard powder/ Maizena)

1                           Spring form, 23cm or 9inch ∅


Peel the apples and cut them up. Put some lemon juice on them to prevent discolouration.
Mix the apples, raisins, cinnamon powder, custard powder and if desired sugar. Leave the mix covered while making the dough for the pie.

DSC_0526

Mix the flour, salt, lemon zest, white and vanilla sugar.
Use two knives to cut the butter into this mixture.

DSC_0538
Dough, before adding half the egg

Add half of the egg to the mixture.
Let the dough rest for about half an hour in the fridge.

Preheat the oven to 175ºC/350F.


Get about 3/4 of the dough and use it to cover the spring form. If desired, cover the dough with some extra custard powder. Spread the apple mixture on top of the dough, spread evenly.
Use the rest of the dough to form a mesh pattern in top of the pie. Smear the rest of the egg over the exposed dough.

Bake the pie for 70 minutes on the bottom ridge of the preheated oven. Let the pie rest for at least an hour before removing the spring form.


Conclusion on the 2015 season

The greenhouse
Of all the things I could have done the early start in the greenhouse/ windowsill was the best decision I made. As early as the end of January I started off by sowing the aubergines. They finally did produce in the summer season. The previous year t20150609_1553hey were always a bit late to really enjoy the produce.

The slow start on the garden was partly caused by a desire to turn the earth double the usual depth. Presown vegetables were waiting in the greenhouse for a chance at the outdoors. Even the broad beans and silver onions had to wait… Then the rather wet start was followed by an extremely dry period. The rest of the beans did not stand a chance to sprout at all. It did have the funny effect that we could eat fresh beans straight up to the end of October.

The greenhouse was “inhabited” cucumbers, gherkins, peppers and aubergines. Even though the produce was very good, there were way too many little problems with mildew and little red spider mites. I’ve therefore decided to completely renew the soil. This might seem rather drastic, but this way I don’t have to worry about the winter. A good harsh winter might have helped a lot, were it not that there also started to grow some unfamiliar mushrooms…..therefore: time for drastic measures! Replacing the soil before the new season

Potatoes
The potatoes were starting off very uneven. A method to cover them up more evenly might be in order. The varieties… The red one, is not coming back next year, unless I find a variety that promises bigger potatoes. The blue potatoes…. still not nicer than my former Blaue Congo, but a decent harvest. The wet weather was definitely a problem, blight got a hold on part of the crop.

Tomatoes
The tomatoes survived longer than ever and yielded an amazing amount of delicious goodness. Especially the smaller cherry tomatoes were successful. The larger meat tomatoes had some trouble ripening before being affected by blight. For next year: trying to get them out of the rain to see if I can improve the late harvest. Previous years have shown that planting in rows was better than groups. The amount of wind and light that I can reach in rows is much greater. Making sure the plants are nice and sleek is in that case easier as well.

Kale
The kale field is still yielding while I write my conclusions. This year I was a bit late moving some of the young seedlings from the sowing patch. They did not like being moved. so the rest stayed very close together in the sowing patch. Thanks to the dill and fennel these plants were rather happy, but for next year: relocate them in time or put them in individual pots, if I can’t place them in the right spot at once.
The eternal kale plants are great for a constant supply of kale. The new pinkish savoy kale I tried was growing very well and is a nice decorative plant. Next year I’m considering putting some in the decorative garden as well.
The red kale somehow still needs more “food”, once again it was not really forming a nice dense head. Another no to the bok choi, it was growing as a very sturdy plant, not a nice wok vegetable.

Combination cultivation
Combining maize and pumpkin was a great success. Next year I won’t grow maize, but this combination is a keeper.
Fennel with the kale seemed to help confuse the butterflies. Next year I’ll have another go to test this once more.

Pepper relish

All those peppers!!! What to do, what to do??? No worries, if you have a lot: freeze them for later use. In my case I like to gather a bit of them. My little Cherry Chocolates combine very well in this next recipe.
The recipe for pepper relish comes out of my mom’s old cookbook collection. The book called “Inmaken en Bewaren” (Canning and Preserving) is a treasure trove of fun recipes. It even seems a bit ahead of it’s time as it includes some more exotic fruits and has recipes that are suitable for diabetics.
A relish is one of the simple things to make, just dice everything finely and combine it all in a pot. Bring to a boil, stir occasionally and wait: Perfection!!!

Ingredients

600 grams   sweet pepperstomato
500 grams   tomatoes
250 grams   onions
4 tb.sp.    vinegar
50 grams   light brown/ brown sugar
hot peppers (to the taste)
2 t.sp.      sweet pepper powder
1/2 t.sp.      smoked sweet pepper powder
1 t.sp.      mustard
1/2 t.sp.      freshly ground pepper
1 pinch   ginger powder

Dice the peppers, tomatoes, onions and the hot peppers.
Put the vegetables, vinegar, sugar and spices together in a pot and oil for about 40 minutes. Stir regularly to prevent any its to stick to the bottom of the pot, especially near the end of the cooking time.

Preserves very well in jars. In our home it hasn’t had a lot of chance, but it will last until the next growing season if you can it correctly.
Together with a little bit of extra ketchup this makes a great BBQ style sauce. It will also be a great base for a Balkan type pepper sauce over your f.e. schnitzel.

Combination cultivation

In earlier posts I’ve mentioned it…. but the full extend of it? I use it throughout the vegetable garden. What started as a simple way to  plant as many vegetables as possible in a defined space, soon became a technique to improve the overall harvest, pest control and a means to have more than just straight forward rows of vegetables.
The 2015 garden really became a humongous jungle because of the weather and plants from last year that had seeded themselves.

As mentioned in my post about maize, I’ve started combining the maize with pumpkin. This really helped reduce the amount of weeds and get more produce from an otherwise not so productive field.

There are always several potatoes that have survived the harvest from the previous years, so they can sometimes be found in up to three of the five sections in my vegetable garden. This years survivors proved once and for all that potatoes and tomatoes don’t like to grow side by side. The potato field this year has just been filled with potatoes the whole time; no combinations here this year. The year before I used the space that was available after the harvest for lettuce and kale.

The designated tomato field: Tomatoes and basil liked each other a lot. So together with lettuce, loads of herbs, marigolds and nasturtiums, this section is becoming a more all round salad field.

The bean field was a great combination of regular and pole beans. Underneath the poles I grow a lot of radishes. This year we tried some onions in there as well. With the peas I always try to grow some dill at the end of the rows. This should help against beans flies and other pests. Marigolds are a regular sight in this plot as well.

The last field of annual vegetables is the kale field. A beloved target of the great white kale butterfly. In attempts to divert their eating frenzy a bit I tend to plant more kale than we could normally eat. The addition of several pots with small kale plants in other areas of the garden had an unexpected success as the first wave of caterpillars was found there. Another plot seemed to be hidden because of some fennel that was growing besides it, by now the fennel is gone and the Brussels sprouts have been infested with great white kale butterfly offspring…. How to keep them safer…. the better combinations will have to be tested. The previous year I had kale in between onions and leeks, which seemed to be rather helpful. Maybe the onion scent confuses the butterflies.

Chilli sauce

The basic sauce
While looking through a lot of my mom’s books for recipes, it is sometimes sooooo much easier to refer you to another website. In this case one of my favourite websites for jam recipes: the Black Dog Farm blog. I truly relate to the laziness toward writing down recipes. Their Tomato Jam recipe is however a perfect start for any chilli sauce. So even though I have downsized the portion, the directions are not different.

The basic recipe (downsized):

* 5 cups      Tomatoes, diced
* 1 cup        Apple vinegar
* 1/2            Bay leaf
* 1               Clove
* Pinch        Allspice
* 1/4 tsp      Sea salt
* 4               Chillies
* 2 1/2 Cup Sugar

Combine the Tomatoes, vinegar, bay leaf, spices and salt. Bring to a simmer and cook for about ten minutes.
Make either finely diced pieces of the peppers or put them in a blender. Add to the tomato mixture. and cook for another five minutes.

Add the sugar. Turn the heat down to medium-low. let it simmer until it starts to become a jam consistency. Remember to stir regularly to prevent the
tomato peels to stick to the bottom of the pan.

tomato2


Cherry Chocolate Chilli Sauce
The cherry chocolate

pepper is a great companion of a nice sweet plum tomato. I’ve really enjoyed combining it with Tasty Tom cherry tomatoes as well. As the pepper is a bit unreliable as to the sharpness of the flavour, I suggest to start of with about three and then just add to the taste.

Madame Jeanette Chilli Saucechilli sauce

Tests with the chilli sauce recipe actually made a really nice dilution

of the essential flavour of the Madame Jeanette pepper. The nicest flavour in my opinion
was when the one pepper was added to the recipe, made with yellow cherry tomatoes.

Maize

Maize or Corn? Who cares, these home grown ones taste soooooooooo incredibly much better than the ones you can buy in the store.. Even one of my little foster kittens had to come and inspect the harvest 🙂

1264241_630830690271822_1983304699_o

The mayor disadvantage of corn is that to get a good crop, you need to plant them in a way that the wind will be able to pollinate “every grain” on the cob; a group of at least three by three plants, in theory anyway. Together with the amount of space you need between the plants…. a lot of space for this stack of corn. That would be a good reason not to do it. I therefore do not make room for it every year. This year however I decided to smarten up. The time you need to keep the soil in between the plants weed free, could be used otherwise; Combination cultivation!! Underneath my corn I’ve grown edible pumpkins. It really helps keep the amount of weeds to a minimum. The only weeds I had to remove were ones that were there at the start of the season and throughout the season at the edge of the field. Two crops in the same space 🙂
Or in other words: Corn chowder, corn on the cob and many other dishes combined with pumpkin soup, pasta sauce and pie; COMFORT FOOD PLOT!!!!
If there are any recipes you might be curious about, do ask!

Peppers of all sizes

Sweet peppers
Sweet peppers, one of our other regulars: In gravy, in soup, in a meatball, mashed potato…. anywhere you might imagine and a couple of other places as well. For some years I’ve been growing them. Outdoors wasn’t the biggest success, in the greenhouse they tend to feel much happier.

The standard red one, I bought as a producing plant. The yellow, orange and purple one I have were grown from seed. These last three did not grow much in the first year. I can imagine the plants might have like either a richer soil or more space. Knowing that pepper plants are not annuals, I decided to pot them up and bring them indoors last autumn. After Ice Saints, the plants were returned to the greenhouse. They have been producing peppers rather happily since 🙂

Cherry Chocolate pepper
Sweet peppers are only one part of the spectrum. A total zero on the Scoville scale. The first “hot” pepper I tried was the Cherry Chocolate pepper. Could you guess I’m a girl?? This one is actually a little bit like playing Russian Roulette. The Scoville scaling for it is different depending on the website/ grower you ask. The lowest I’ve seen was about 500, not much more than the sweet pepper, up to 5,000! When harvesting my produce, I experienced just that. Some were just fine, others I could feel the burn in my nailbeds – maybe you should consider wearing gloves, when working with them? I’ve sown a couple more this year and my 2014 plant underwent the same treatment as my sweet peppers and is in it’s second year of producing. It’s great for Chilli sauce and in a pepper relish.

The 2015 pepper selection was further extended to include “Jalapeño”, “Czechoslovakian Black” and “Royal Black” peppers. In the spur of the moment, at a garden centre, a “Madame Jeanette” was added to the collection as well.
The Jalapeño is known for it’s use within our western view of the Mexican kitchen. It’s one of those condiments I like as a sort of snack as well. The Czechoslovakian Black was therefore a logical choice, as it is described as a black Jalapeño; try them together and see if it’s true?
Let me tell you: It’s true somehow during the planting the two groups of plants got a bit mixed up and it’s really hard to tell my two varieties apart, even when they started blossoming and growing peppers! I’ve just used them on the go in f.e. Salsa Verde and Kimchi.

The Royal Black has dark leaves as well as fruits. Considering they will be in the windowsill during the winter again, this was a nice option for a sharper pepper. At 5,000-30,000 Scoville it could be as the mildest of Thai peppers. That combined with it’s tiny fruit size would make it great for the occasional stir-fry. The colour of the leaves of this plant are a bit shy of the Dark Opal Basil colour; more a dark green with a deep purple haze. The stems are however nearly black. Truly ornamental. I’m definately going to enjoy it as an ornamental during the winter. While writing this I still have to test the distinct flavour using my chilli sauce recipe. I’ve planned to just substitute the peppers and leave the recipe otherwise unaltered.

The added Madame Jeanette, clearly bumped the Royal Black of it’s throne, where hotness is concerned. The amount of pepper still in the freezer, of the Madame Jeanette could, if you ask me, still last us some years. This one is in most instances a bit too sharp, and not often used in my cooking. I could tell a fun story of how my dad thought to  have found a nice box of sweet peppers though…. In the chilli sauce it however becomes a nice hot condiment.

With all these peppers I know one thing: My west facing windowsill is going to be a bit crowded this winter! Who wants a guest for theirs??

Mississippi mudpie

Considered the crowd favourite for all my chocolate loving friends:1008858_693922527295971_619246650_o
T
he blind baked crust with a rich chocolate filling, optionally topped with loads of whipped cream has melted many hearts. And why shouldn’t it. By always experimenting a bit with the chocolate flavour of the filling it is always just the tiniest bit different. Don’t be afraid to try different brands of chocolate, add more or less of it; try adding more vanilla or why not a bit of hazelnut paste? My friends loved each and every one of them, even the one that had not completely set…

My recipe is a combination of two recipes. The first can be found on the webpage belgischechocolade.com and the second one coming from a small booklet called “Simpelweg lekker – Vegetarische keuken”.


Ingredients
Crust
225 grams (8 ounces)   flour
150 grams (5 ounces)   butter
2  tbs                               cacao powder
2  tbs                              (white) sugar

Filling
175 grams (6 ounces)   butter
350 grams (12 ounces) brown sugar
1 bag                              vanilla sugar
4                                      eggs (lightly whisked)
4 tbs                                cacao powder (sifted)
300 ml (1 1/3 cup)         heavy cream (unwhisked)
… grams                         chocolate*


Description

  • Sift the four and cacao powder
  • Use our fingertips (or food processor) to incorporate the butter, the mixture will resemble breadcrumbs.
  • Mix in the sugar
  • Add some water to form a light dough.**
  • Wrap the dough on plastic wrap and let it sit in the fridge for about 15 minutes.
  • Preheat the oven to 190 degrees (380F)
  • Roll out the dough to fit a 23cm tart pan. Cover the dough with baking paper and weigh down with bake beans.*** Bake for 15 minutes.
  • Uncover the crust and bake for another 10 minutes.
  • While waiting on the crust to bake, make the batter for the filling.
  • Melt the chocolate Bain-Marie.
  • Whisk together the butter and sugar. Slowly add the eggs and sifted cacao powder.
  • Incorporate the heavy cream and chocolate. This is also the moment to add other flavours.
  • Take the crust out of the oven
  • Lower the oven temperature to 160 degrees (320F)
  • Pour the filling in the crust and bake for 45 minutes, or until the filling seems solid.

Let the pie cool down completely before serving, as the filling will set completely when cooled.
If desired, decorate the pie with whipped cream and chocolate.
Serving with ice cream, is always an option 😉


*As said in the introduction you can do a lot with the flavour of this pie. I’d not recommend using less than 200 grams of chocolate, as the flavour will lose a lot of depth.
**The amount of water needed depends on the butter and the desired crumble of the crust. the more moisture you add, the less your crust will crumble. Do be careful as too much water will make your crust very hard.
**I alternatively freeze the dough and then bake it without covering it up, finding it gives a lighter crust.

Blog at WordPress.com.

Up ↑